This blog guide you how to take traces for non admin users and how it can
be downloaded for analyzing further.

Note: Non Admin user can only collect the trace and upload. Only Admin can download and analyse it.
Below are the sections we gonna talk about in this post to collect trace for non admin users.
- Grant trace access to user.
- Capture the trace and uplaod.
- Download the uploaded traces(Only Admin user)
Grant trace access to users:-
1. To grant a user rights to capture a trace for non admin users, go to
"System administration > Users > Users".
2. Select the user<JP> and assign the "System tracing user" role.

Capture the trace and upload:-
1. Now if you login as
user <JP> (which is non admin user), will have option to collect the trace. click on it to collect the trace
2. Before you trace make sure you executed the scenario you want to trace once before you take the trace. That will prevent things like metadata loading and other possible warm up tasks from being in the trace.

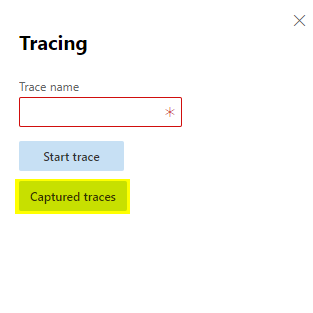
3. Name the trace that
you are about to capture, and then click Start trace.

4. Reproduce the issue/actions that
need to be analysed.
5. When you are
finished, click Stop trace.

6. Then, upload the trace so that Admin user can
download the same and analyse it.
Upload trace – Store the trace in
the cloud for later user with system admin can download the same.

Download Trace: - This option only available for Admin users where you can store the captured trace on a local machine. You can analyse a downloaded trace with the desktop version of Trace Parser.
Note: If you download a trace it will not be available for later uploading, so its always suggested to upload the trace fist then download it.

Download the uploaded
traces(Only Admin user):-
Note: The captured traces button can only be seen by users with administrative rights and will be automatically deleted after 7 days.
1. In the navigation bar, select Settings,
and then click Trace.

2. Click on Captured traces to view.
3. Just click on the trace name you would
like to download.
Please note: The Maximum ETL file size is 1024 MB, so if your scenario takes more than 1-2 minutes it is better to try to take multiple smaller traces of 30 seconds each. it helps you to not to miss trace information and also if the file size is less then its easy to analyse.

Hope this helps and I will come up with another interesting blog post soon.
Happy Daxing :)
Tags
Dynamics 365 for Fiance and operations, #D365, #Trace, #TraceForNonAdminUser, #TraceParser , #Logs, #User, #UploadTrace, #DownlaodTrace, #CaptureTrace
No comments:
Post a Comment