Thursday, December 19, 2019

Registering a Microsoft Dynamics 365 Finance and Operations app with Azure Active Directory for OAuth 2.0 authentication (Integrations)


As we know D365FO implements Azure Active Directory based authentication for Web Services. Azure Active Directory Service provides identity as a service with support for industry-standard protocols. D365FO outsources authentication to Azure AD and any integration application like below should be registered app in Azure active directory and register the same in D365FO.
  • Recurring data batch job (Data management)
  • Recurring Integrations Scheduler (Used to upload file from  on premises to  D365FO using Data management(Local file share))
  • OData services
  • API’s ( Retail Server, CRT, OData services etc.. )
  • Customer web services

Getting started:-
To enable Microsoft Dynamics 365 Finance and Operations app access to external system then we must have the following:
·         Azure Active Directory account
·         D365FO account with Administrative permissions

How to do it...
First register a D365FO with Azure Active Directory in Azure portal:

1. In browser, Login to Azure Portal with Admin account (Preferably Dynamics 365 finance and operation Admin account which never expires) - https://portal.azure.com then click on “Azure active directory”

2. From the left-hand navigation toolbar, Under Manage section click on App registration and click on “New registration” to create new app.

3. In “Register an application” form, provide following info
Name: - <Can be anything friendly name>
Supported account types :( based on requirement, users can access from any AD)
Redirect URI: <it’s an optional parameter, you can give you D365FO URL as well>


4. Then Click on “View API permissions” to provide access to D365FO


5. Click on “Add a permissions”


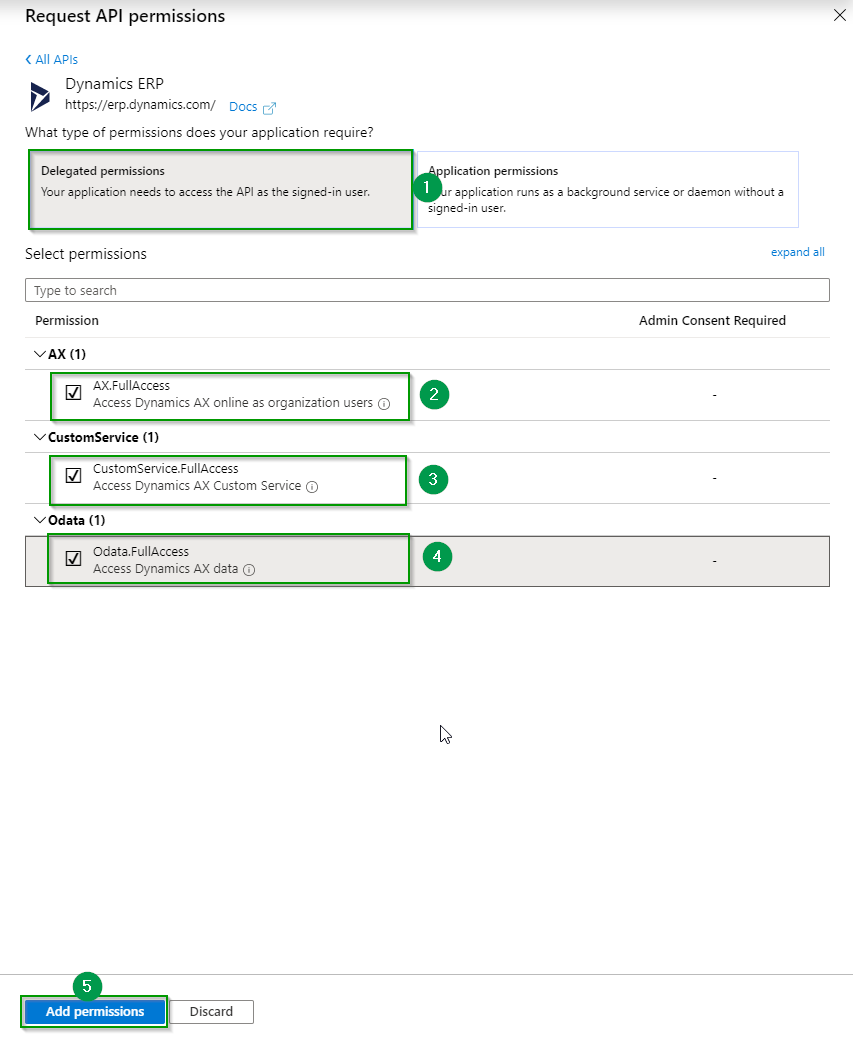
6.  On the Request API permissions/Select an API page, select Dynamics ERP to grant the access.


7. Then click on “Delegate permissions” and provide access as based on your need: here I have given full access for all three, then click on Add permissions.
·         AX.FullAccess, 
·         CustomService.FullAccess
·         Odata.FullAccess.


7    8. Left side tool bar then click on “Certificate & secrets” under manage to generate secret key.


8    9. Click on “New client secret


      10. In “Add a client secret” form provide Description as you like and Expires as “Never”, so it will not be expired. Then click on “Add


     11. Please make a copy of newly created client secret value else will not be able to see once you leave the page.


      12. Once you registering D365FO application, then make a copy of the Application (client) ID as displayed in your application's overview page and secret key, as you will need to provide it during the authentication process.
Register the Newly created Azure Application with Dynamics 365 Finance and Operations
The Azure AD Application(s) created in the previous step need(s) to be granted access to the specific instance of D365FO.
Note:- This is required only if you are going to use service to service authentication type using secret key instead of user impersonation.
      1. In a web browser, navigate to Dynamics 365 Finance and Operations.
      2. Navigate to System Administration -> Setup -> Azure Active Directory applications and then click New.


      3. Enter the following values in their respective fields:
·         Client Id: <Application ID registered in Azure Active Directory, in previous steps>
·         Name: <Name for the application based on usage>
·         User ID: <Preferably service account user who has full access on D365FO>


How to verify...
After completing these steps, you should have this information recorded and available:
·         Application (client) ID
·         Client secret

We will use this information for authentication if you want to do CRUD operation in side D365FO from external applications.

Hope this helps, in another blog I will come up with how to make use of this authentication and import data using "Recurring Integrations Scheduler"

Monday, December 9, 2019

New feature - "Job history cleanup" batch job for Data management and other cleanup routines in Dynamics 365 for Finance and Operations

In this blog I would like to explain about the new batch job introduced in data management to clean up execution history and other list of clean up jobs which are available across modules in Dynamics 365 for Finance and Operations. 

Please check the list of clean up jobs in D365FO in Microsoft blog

And the most awaited clean up job has been released for Data management module (available in Platform update 29 and later), which is very important for most of the business as every business uses Data management (Integration, Data Migration or BYOD etc..) and this should be scheduled to clean up data regularly, else we end up with performance issues.

This “Job history cleanup” clears information from following tables.
    •   All STAGING TABLES
    •   DMFSTAGINGVALIDATIONLOG
    •   DMFSTAGINGEXECUTIONERRORS
    •   DMFSTAGINGLOGDETAIL
    •   DMFSTAGINGLOG
    •   DMFDEFINITIONGROUPEXECUTIONHISTORY
    •   DMFEXECUTION
    •   DMFDEFINITIONGROUPEXECUTION   
The functionality must be enabled in feature management and then can be accessed from Data management > Job history cleanup.


      1.     Please go All workspaces > Feature management and select “Execution history cleanup” and enable.


        2. Once we enable this feature then we should be able to see new tile called "Job history clean up" added to Data management module.


This can be run as batch job with following parameters setting up.
  •   Number of days to retain history
  •   Number of hours to execute the job
  •   Recurring batch
For more information check Microsoft documentation.

Tags, 

#D365FO, #DataManagement, #CleanUp, #Clear, #DeleteExecutionHistory, #JobHistoryCleanup


Monday, December 2, 2019

Extending standard dataentity to add customized fields in Dynamics 365 finance and operation

This blog I will explain how can we extend standard entity to add our custom fields, Extensibility of standard data entity is indeed thing when we are implementing Dynamics 365 for Finance and Operations, and it is important to be able to have extensible data entities; else, we would have to write new data entities to be able to use a field we added to a standard table as an extension.
In this example, we will create an extension for the Customer entity, named CustCustomerV3Entity.
Getting started
Part of this recipe is to add an extension field so we can import data into it, so the first part is to create an extension for the CustTable table with a new field. This is optional, but is included in order to demonstrate how this is done.
To follow this optional step, create a table extension for the CustTable table and add a new field of type Title called JP_Title. Also, add this to a form extension so we can see the results.
We should know following objects before we start customizing:-
                 1. Target Table
            2.  Form name
            3.  Entity name
            4.  Staging table
How to do it...
Please follow below steps to create a data entity extensions:
     1)  Add your custom field in CustTable extension. Build your model.
     2)   Add this to a form extension of CustTable so we can see the results.
3)   And we can see the field on CustTable List page
4)   Create Data entity extension for CustCustomerV3Entity. You should see your field in the data source and add this new data source field in the entity field list’
5)   Add the same field in new table extension for CustCustomerV3Staging table
6)  Complete build & database synchronization.
7)    In D365FO UI, Go to System administration > workspaces > Data management > Framework parameters and select the tab Entity settings and click on Refresh entity list
       8)  Then go to System administration > workspaces > Data management > Data Entities, regenerate the mapping for CustCustomerV3Entity
     9)   Then we can see our newly added field mapping under the list.
How to verify...

We can verify this by adding CustCustomerV3Entity to excel and refresh the data and see the newly added field part of entity. For more information, please check the Open entity data in Excel when you start from Excel

Hope this helps and I will come up with another interesting blog post soon.

Tags,
#D365FO, #DataEntities, #Entity, #Extensions, #Standard , #DataEntity

Friday, November 15, 2019

Configuring GDPR "Person Search Report" in Dynamics 365 finance and operations

This blog I will explain how can we configure Person search report. This report help you to discover personal data that is subject to a DSR request as per GDPR (General Data Protection Regulation), for more information look at Microsoft documentation

But when we are running this report for first time then we might end up with below error as there are few configuration steps we need to execute before we run this report.

"You are not authorized to access table 'PersonSearchResultDriverView' (PersonSearchResultDriverView). Contact your system administrator.
The menu item with name personsearch could not be opened
."


Make sure following steps are executed before you run "Person search report"

1)     Enable license configuration Key "Warehouse and Transport Management" 

2)     Load the "Person report template" in Data management framework

1)    Enable license configuration Key "Warehouse and Transport Management" 

First we need to enable the license configuration Key  of Warehouse and Transport Management in order to be able to use the GDPR "Person search report".

Steps to Enable:-

a.      Go To System Administration -> Setup -> License configuration
b.     Navigate to Trade and Enable "Warehouse and Transportation management"

P.S: we can't modify this License configuration key until we set maintenance mode on the Environment/VM. If you don't know how to do the same, then you can find steps in Ms doc.

Documentation available for following environments types and choose the one which suits you.

1.      Environments like Sandbox and production environments through Lifecycle Services
2.      Dev/Test/Demo environments hosted in a Microsoft subscription or cloud hosted
3.      Dev/Test/Demo environments and VHD-based environments hosted in customers' subscription

2)    Load the "Person report template" in Data management framework:-

    How to configure:-

 A. Load the "Person report template" as follows:
1.     Open the Data management workspace.
2.     If this is the first time that the workspace has been opened, it will load all of the data entities. You must load all the data entities before you load the template.
3.     Click the Templates tile.
4.     Select the Load default templates button.
5.     Select Person search.
6.     Click Load selected

 How to test the report:-

1.     System administration menu, open the Person search list page, and create a new search.
2.     Process the report

For more information check Microsoft Docs

Hope this helps and I will come up with another interesting blog post soon.

Tags

#GDPR, #D365FO, #PersonSearchReport, #DataManagment, #Dynamics365